Game Theory is our latest audio visual mashup performed live on re-wired video game controllers.
2013 marks 35 years of video game music (Space Invaders, released in 1978, was the first game to feature a continuous soundtrack). So we took the opportunity to take a look back at some of our favourite examples of video game music and build a 19 track mashup, combining them with some other tracks we love.
The tracks used vary from some of the original 8-bit tracks from the Atari, GameBoy, through to 1990s N64 and PS1 classics, right up to modern day symphonic epics that accompany some of todays blockbuster games…
Grab a free mp3 download of the track via our facebook page.
Tracks used:
Tetris Music A (Game Boy)
Abba - Mamma Mia
Doctor Who Theme
Super Mario Bros
Street Fighter II Turbo
Arkanoid
Goldeneye - Chemical Warfare
SBTRKT - Wildfire
Lana Del Rey - Video Games
Michael Jackson - Beat it
Grand Theft Auto IV Theme
Final Fantasty VIII Theme
Time Crisis
David Bowie - Let’s Dance
Call of Duty Modern Warfare 3 - Main Theme
Sonic
Basement Jaxx - Where’s your head at
Run DMC - It’s Tricky
Super Mario Bros - Game Over (..and a bit of GLaDOS)
The set-up
We needed to convert the controllers so that they could send midi data to Ableton Live. This was a two step process involving converting the controllers to HID compliant USB devices (you purchase simple kits online to rewire the controllers or alternatively, USB adapters to plug the controllers into into). Once the Contollers were outputting a HID signal through USB to the laptop all that was left was to convert this to midi.
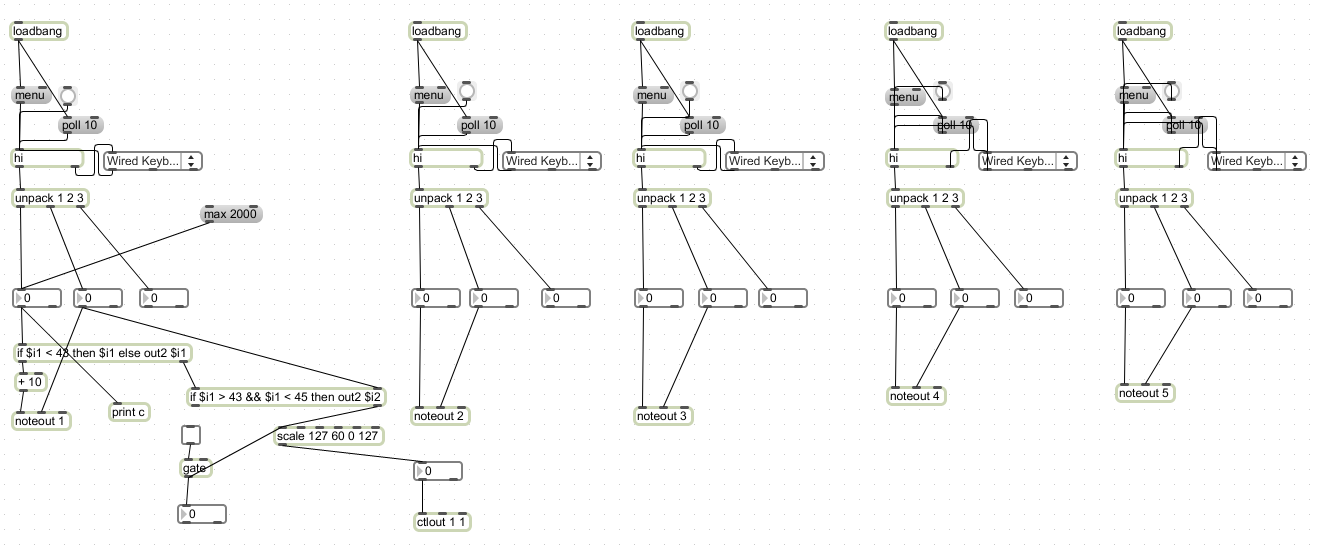
We created a Max/MSP patch, which converted the HID data into MIDI note on/off signals
HID to MIDI MAX/MSP Patch
You can download the Max/MSP patch here. You will need the free Max/MSP runtime application available here.
Instructions
This patch can control 1x N64 controller and 4x NES controllers (or possibly other game pads) converted to HID compliant USB devices. The first dropdown box is for the N64 the others for the NES controllers.
Select any N64 controllers from the first dropdown box from the left
Select any NES controllers from the other dropdown boxes
Noteout 1 sends the N64 buttons out as MIDI, Noteout 2,3,4,5 send the NES buttons out as MIDI. ctlout 1 sends the N64 joystick out as controller data for controlling variable parameters such as volume, filter cuttoff etc. If you are using a Mac then setup an IAC bus if you are on PC then setup midi yoke (these will enable you to send MIDI data from MAX/MSP to another application.
Click on noteout 1,2,3,4,5 and ctlout and select either your IAC Bus (mac) or your midi yoke output (PC).
If using Ableton live, in Live->Preferences toggle ‘Remote’ input on for IAC Driver (mac) or Midi Yoke input (PC).
Click the small MIDI button in the top right hand corner of Ableton and when highlighting clips or parameters, press any of the controller buttons to assign the controller.
Following the performance there were a lot of questions about the setup I used. This post will aim to run through the different hardware and software used, some of the problems that arise mixing multiple videos in real time and a few of the solutions.
The Setup
AKAI APC40
Laptop
MIDI Yoke
Monomulator (optional extra)
Ableton Live 8
Arkaos GrandVJ
Microsoft LifeCam Cinema HD
AKAI APC40
First of all, some kind of hardware controller is a good idea. While you can trigger clips with your computer keyboard a dedicated controller like the AKAI APC40 is far more engaging to perform with and much more interesting for an audience to watch. The APC40 benefits from a great visual feedback mechanism so you and the audience can easily tell which clips are currently active and which are available to trigger. It uses the MIDI protocol to both communicate with the software used and to trigger the lights within the pads.
There are a few similar hardware options available but the APC40 has a great mix of clip launching pads along with rotary and slider controls.
Also worth considering are:
AKAI APC20 (the same as the APC40 but without the rotary controllers)
While you could carry your desktop to a gig, it’s probably not the best idea.
Laptops are pretty powerful these days but if you are going to be running high quality multi-track audio along with multiple video then you will need something with a reasonable spec. The laptop I use is a Dell Studio 1558:
Intel Core i3 2.13Ghz
3GB RAM
Windows 64-bit
Midi Yoke
Midi Yoke is a great MIDI routing driver for Windows (IAC does this on Mac) allowing you to send MIDI between applications. While both Ableton Live and GrandVJ are capable of communicating via ReWire I found using Midi Yoke to be a little more straight forward as there is no need to send transport information such as track position etc. between the two applications. It also allows you to use the excellent Monomulator application.
Monomulator (optional)
Note: While the Monomulator was not really used in the performance at Update it is part of my setup and gives you some great additional options if you own an AKAI APC40 or Novation LaunchPad.
I’m a big fan of the Brian Crabtree’s Monome projects, especially the original 40h seen here:
The Monomulator is a great, free Max/MSP application by TrackTeam Audio that takes the input from the APC40 and remaps the MIDI messages to increase the ACP40′s functionality, run Monome apps and output OSC.
In standard mode the Monomulator takes the MIDI messages and simply passes them though onto Ableton Live (as if the Monomulator was not there). Pressing combinations of the Shift and Send buttons on the APC40 selects different modes, which remaps the APC40 controls giving you a fader mode, a keyboard mode and a Monome mode (allowing you to run monome apps). This can be a little tricky to set up but Banginclude on YouTube has recorded a couple of very useful videos showing the setup and use of the Monomulator.
Ableton Live 8
Live 8 is fantastic for audio performance and as it’s name suggests it is heavily geared towards live use so it is stable, fast and inspiring to use. In this setup Ableton Live deals with all the audio in the performance and also sends MIDI messages on (using MIDI Yoke) to GrandVJ (which deals with all the video).
Click the image below to see a screenshot of the Update performance file:
The track is arranged into scenes (horizontal strips) with each scene containing the audio file to be played on the left and a series of MIDI files that will then send data on to GrandVJ via MIDI Yoke on the right. All clips simply send a MIDI note matching the length of the audio clip they represent. The red clips send a MIDI note to GrandVJ which stops one of the layers from displaying video.
Triggering the scene on the APC40 will play the audio in Ableton Live and also the MIDI clips which are then routed like this:
Each of the MIDI tracks outputs to MIDI Yoke (in this case MIDI Yoke 7, but you can just pick any unused one) and importantly outputs on MIDI channel 2. This is because the APC40 uses MIDI note on and off signals on channel 1 to communicate with Ableton Live. This helps stop any accidental triggering of clips as the MIDI data going from the APC40 to Ableton Live will always be on Channel 1 and the data going from Ableton Live to GrandVJ will be on channel 2.
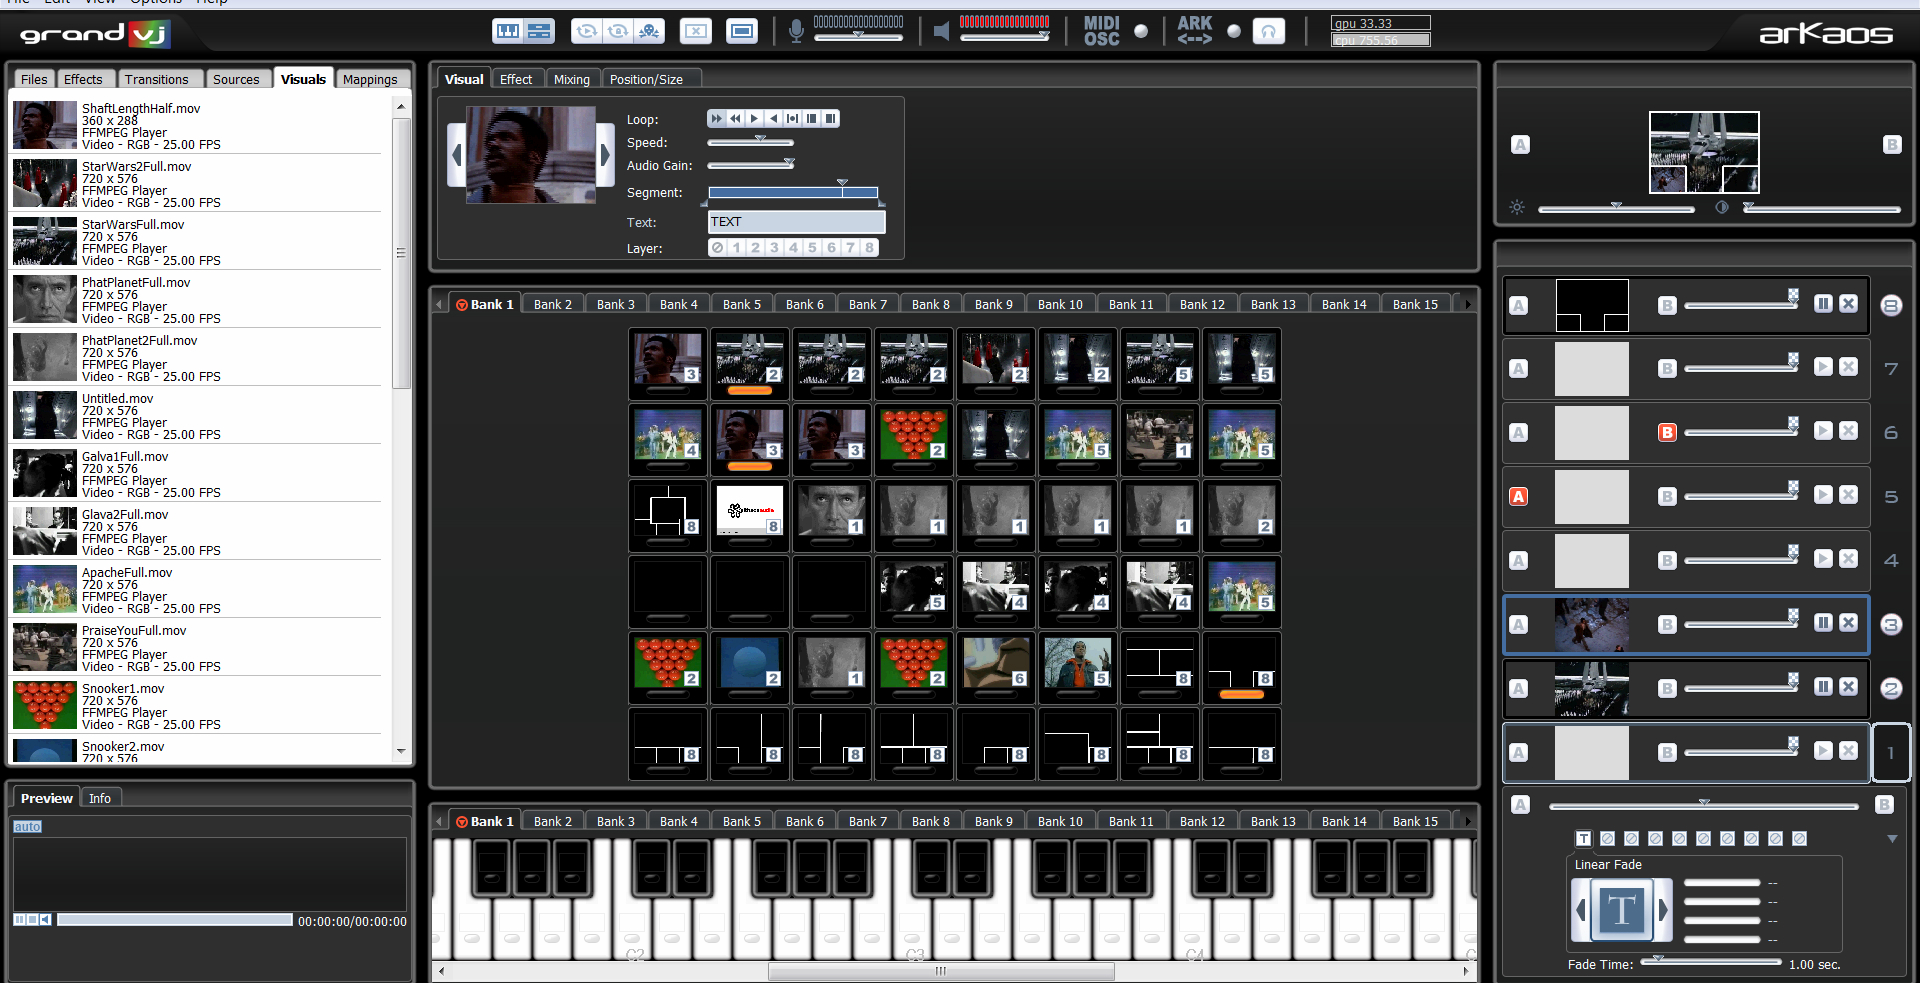
Arkaos GrandVJ
There are a few options out there for controlling video in realtime. GrandVJ is nice as it has two performance modes, is very stable and has great MIDI integration.
Click the image below to see the Arkaos File for the Update conference:
Each video is assigned to one of 8 layers that can then be controlled in the right hand panel. This works much in the same way as layers in Photoshop. All the clips assigned to the top layer are image files set up as masks, creating the white borders around the videos.
You can take a look at the MIDI mapping of the video files by clicking this image:
As you can see each of the video files is MIDI mapped to activate when it receives the corresponding MIDI note on channel 2 from MIDI Yoke (sent from Ableton Live). In the layers panel the ‘Kill Layer’ buttons each have a MIDI assignment that comes from the red clips in Ableton Live. This stops videos from a previous part of the track continuing to loop when a new section is triggered.
You will notice 3 additional MIDI mappings on channel 1. These are set up to take MIDI data directly from the APC40, in this case the rotary controllers. This way you can control both Ableton Live and GrandVJ at the same time with one controller.
Two of the rotary dials are mapped to control the opacity of a layer in GrandVJ as well as control the cutoff on a low pass filter on a track in Ableton Live. Turning the dial will fade in the video and also filter in the audio (which is a slightly nicer effect than just fading in the audio).
One rotary dial is mapped to control the audio cross fader in Ableton Live and the video cross fader in GrandVJ allowing very quick flipping between the two videos and corresponding audio.
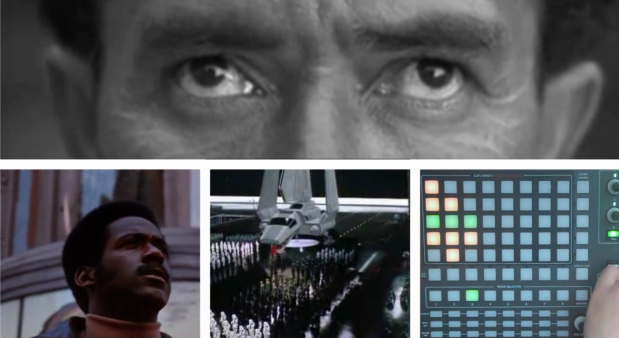
Microsoft LifeCam Cinema HD
Having some kind of visual indication of the actions you are taking during a performance greatly increases the audiences understanding of the process and the music being played. GrandVJ can take a variety of video sources and mix them with video files and a webcam is a really simple way of doing this.
For the performance I just positioned the webcam on the APC40 so that the audience could see what I was doing with the control surface and also in the background could see themselves (helping to prove that it is actually all being performed in real-time, which can be a problem). GrandVJ treats this just as it would a video file and you can assign MIDI to trigger the webcam input.
There are tons of webcams out there. The LifeCam is very straightforward and outputs at a high resolution (if you want it to) so is a good choice for this kind of thing.
System Drawbacks
This setup is definately a work in progress and there are a number of drawbacks including:
Scene trigger only
As each audio files needs to trigger a corresponding MIDI file in Ableton Live you can only control the flow of the track through triggering scene rather than individual clips.
Video layout
The videos have to be layed out manually before the performance so if a video loop is playing full screen in one section of the track and in the bottom quater of the screen later on you will need two video clips in GrandVJ and assign there position and size properties in advance. This is another reason for scene triggering as each scene has videos at different sizes and a border mask to match those videos. Ideally the system would automatically detect the number of videos triggered and assign them in real-time to a place on the screen.
MIDI mapping
While the MIDI mapping system works well it is extremely time intensive to create all the MIDI clips in Live them assign them in GrandVJ and test it all. You need to have a fairly set idea of the track arrangement before you start.
Other options
There are lots of different ways of doing this kind of thing and one to diffinitely look into is JAM by fellow Brightonian Jonathan Hammond. This is a Mac only application that allows you to control visuals through Ableton Live and Serato.
If you know of different solutions for live A/V setups then let me know in the comments.
Also it you have any questions about the setup described then just ask below or contact me on Twitter